Kia Sportage: Engine Control System / Variable Charge Motion Actuator (VCMA) Repair procedures
Kia Sportage QL (2015-2025) Service Manual / Engine Control / Fuel System / Engine Control System / Variable Charge Motion Actuator (VCMA) Repair procedures
| Removal |
| 1. |
Turn the ignition switch off and disconnect the battery (-) terminal.
|
| 2. |
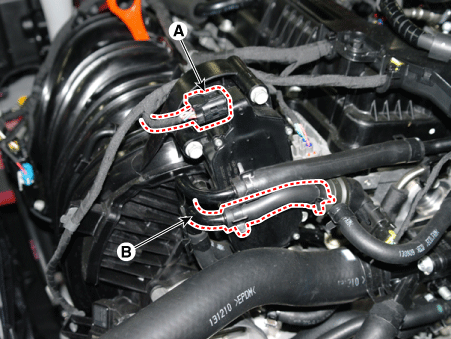
Remove variable charge motion actuator connector (A) and three mounting
bolts.
|
| 3. |
Remove intake manifold vacuum pipe (B) in order to secure work space.
|
| 4. |
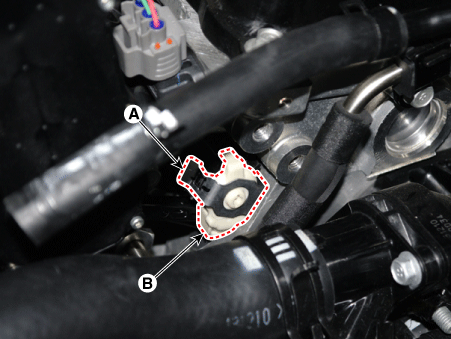
Remove VCMA rod clip (A) and connection link between flap (B) using
screwdriver.
|

| Installation |
| 1. |
Install in the reverse order of removal.
|
|
Variable Charge Motion Actuator (VCMA) mounting bolt :
9.8 - 11.8 N·m (1.0 - 1.2 kgf·m, 7.2 - 8.7 lb·ft)
|
| Adjustment |
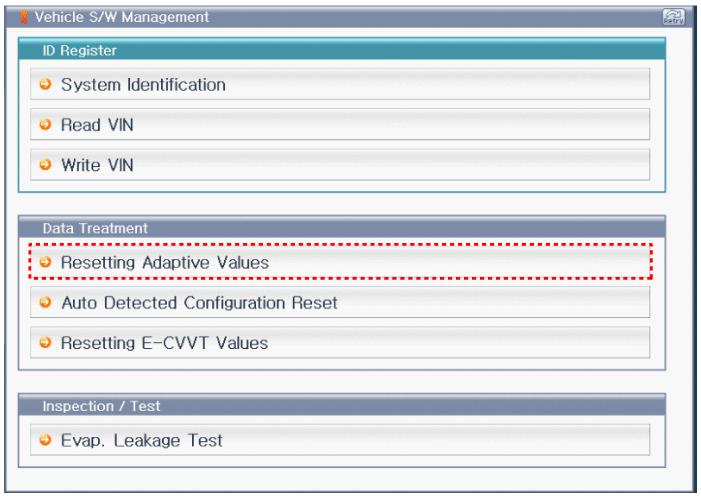
After replacing the VCMA (Variable Charge Motion Actuator) or intake
manifold, be sure to delete the previous VCMA adative value by performing
the 'resetting adaptive values' procedure using KDS/GDS.
|
VCMA learning procedure is performed automatically while driving but
manual learning procedure is also available for immediate access to
proper operation.
|

| 1. |
Switch "OFF" the ignition.
|
| 2. |
Connect the KDS/GDS to Data Link Connector (DLC).
|
| 3. |
Switch "ON" the ignition.
|
| 4. |
Select "Vehicle, Model year, Engine, System".
|
| 5. |
Select "Vehicle S/W Management".
|
| 6. |
Delete the previous VCMA adaptive value by selecting "Resetting Adaptive
Values".
|
| 7. |
Press [Reset] when ready.
|
| 8. |
Reset completed.
|
 Variable Charge Motion Actuator (VCMA) Schematic diagrams
Circuit Diagram
Harness Connector
...
 E-CVVT motor Components and components location
Components
Appearance of E-CVVT is similar to that of hydraulic CVVT. Connector that drives
DC motor and protection cover that protects the motor are mounted on the upper
part. D ...
Other information:
Kia Sportage QL (2015-2025) Service Manual: Repair procedures
Removal 1. Remove the front bumper cover. (Refer to Body - "Front Bumper Cover") 2. After loosening each mounting bolt of the low-pitch horn (A) and high-pitch horn (B), detach the connector (C) and remove the ho ...
Kia Sportage QL (2015-2025) Owners Manual: Opening the liftgate
The liftgate is locked or unlocked when all doors are locked or unlocked with the key, transmitter (or smart key) or central door lock switch. If unlocked, the liftgate can be opened by pressing the handle switch and then pulling the handle up. Only the liftgate is unlocked if the lif ...
Copyright © www.ksportagegl.com 2015-2025
